
Draperies 101 - The ins and outs of draperies explained

I get asked for my advice on draperies quite a bit… anything from how high to hang them to how wide they should be. I always feel a little bad when someone from social media inevitably comments on a photo asking “where did you get those draperies?” and I have to reply that they were custom made - which I know isn’t much help to my follower, but it’s the truth. So today, I thought I would try to clear up a little bit of the mystery behind draperies, because they can be intimidating to get right.
With that said, I am a huge advocate for custom draperies. HUGE! In all honesty, I wouldn’t even bother with store bought ones if you can afford it; at least for the main rooms in your home. For starters, custom draperies will actually fit your windows and ceiling height - which is reason enough. And whether you work with a designer (which I recommend) or with a local fabric showroom the overall outcome of custom made draperies will be worth every penny. And so will working with a professional due to their knowledge on the details, hardware, construction and their access to top notch fabrics and trims. But if you are thinking about draperies, hopefully this post will clear up some of the basic questions that you may have.


Types of draperies (fullness)
Typically when we are talking about various types of draperies we are referring to the pleat style (see below). But the type can also be referring to functional or non-functional draperies…. functional meaning that those draperies are wide enough (or full enough in drapery terms) to actually cover the window when needed. Non-functional means that they are just there for looks and wont actually cover the window. Non-functional draperies are useful when you have a rather wide window that you want to dress but it would take a LOT of fabric to get the width that you need to cover the whole window, and you don’t actually need to cover the window anyway. That would be an opportunity to just go with decorative, non-functioning drapes.
HOWEVER - you will almost always want to do what we call a “width and a half” of fabric per panel at least in order to get the correct visual “fullness” for each panel. This means that you will want do do a “width and a half” of fabric yardage per panel so that your draperies don’t look too skimpy. Store bought, ready-made draperies will never be more than a single width- just saying. Thats partly why they always look skimpy and flat to me. The other reason being that they are rarely lined. Unless you specifically want a pair of draperies to be somewhat see through or very “airy” I always recommend lining. White linen draperies that are lined will still look light and airy with the lining - they will just hang with more pretty fullness than they will if there is no lining.

Types of draperies (pleats)
Another reason that I love custom draperies is for the pleating. Pleats always make draperies and windows and rooms look better in my opinion and you wont find many ready-made draperies with pleats. My favorite type of pleats are pinch pleats - that is what you will see in 90% of my designs. I can appreciate straight draperies (no pleats) at times, especially in more modern rooms, so long as they have proper fullness. And for the love of all things design please DO NOT do those draperies that just have a pocket for the rod to slip through or grommets (ringed holes) in the drapery panel themselves. Those are reserved for dorm rooms only and I will tell Santa on you if I catch these in your home. Moving on…
The main types of drapery pleats explained:
Flat Panel - no pleats, just a straight drapery panel.
Pinch Pleat (or French Pleat) - the pleat consists of 3 folds of the fabric “pinched” about 3” down from the top of the panel
Euro Pleat (or Parisian Pleat) - the pleat still consist of 2 or 3 folds of fabric, but it is pinched at the top of the panel.
Inverted Pleat - The pleats invert or fold to the back of the drapery, giving a pleated look with a flat front.
Rod-Pocket - when the rod slips through a sleeve in the drapery and everything is bunched at the top like a mess. Don’t do this.
Grommet Style - When there are metal rings fixed directly into the drapery for the rod to slip through. Do not do this either.

Hardware explained
There are 5 parts to drapery hardware: the rod, rings, brackets, finials (unless you are using a french rod) and wands. You will either be using a straight rod or a french rod, which is a rod that curves back into the wall (like the ones in the photos above) in which case you would not need a finial. Finials are the decorative pieces that go on the ends of a straight rod to finish the look. Typically they are a ball or an arrow or a fleur de lis type of piece depending on how formal or casual your look is. Rings are what you should always use as to avoid the cardinal sins of rod-pocket or grommet draperies - everyone with me so far on this?
Brackets - regardless of the rod, straight or french, you will have brackets on the ends. A french rod will have brackets on the actual ends, straight rods will have brackets inset about 3-4” from the ends. If your rod is wider that 72” I recommend using a center bracket both for safety so that your rod doesn’t come crashing down and also to support the center of the rod so that is doesn’t curve in the middle.
Wands - these are not necessary, but highly recommended for draperies that will actually be opened and closed regularly. The wand is a rod that hangs down the back of the draperies from the first ring on each panel. When you use the wand to open and close your draperies you are less likely to tug on the fabric and risk damaging or stretching the front of your draperies over time - which absolutely can happen.


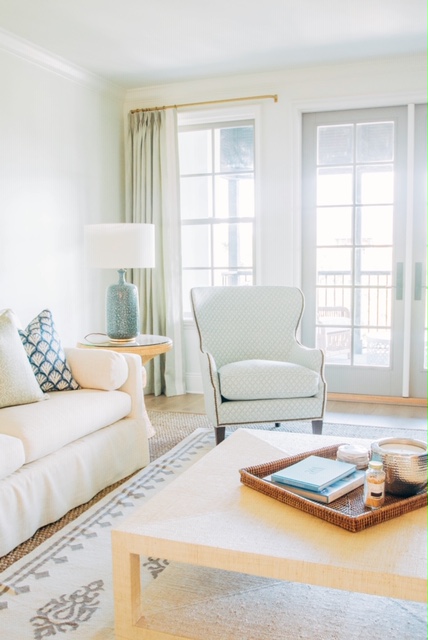
We took these draperies (above) right to the crown molding to elongate the window. We placed the draperies (right) about 8” above the window frame.

Hanging your Draperies
This is the moment you have all been waiting for I’m sure, since “how high to hang draperies” is what I get asked about the most. Of course this depends on a lot of factors, so there is no “one size fits all” answer. But, a good rule of thumb in general is to hang your drapery rod at least 6”-12” above the window frame. For a 9’ ceiling I would air toward 6” and go up for taller ceilings. Sometimes, especially for 9’ and 10’ ceilings you can just split the difference in inches between the top of the window frame and the bottom of the crown molding or the ceiling, which is a very visually pleasing, balanced look. Do not… I repeat, DO NOT… hang your rod right above the window frame unless you want to have short, squatty looking windows…. again, I will tell Santa about this if I catch you doing it.
Once you hang your draperies, you will want to “train” them. Meaning, give them some love, take them on walks, read them bedtime stories….. just kidding. Training your draperies means steaming them to get the wrinkles out and make the fabric “moldable”… then with your hands help the fabric wave in and out according to the natural wave that the pleats create. This step is a pain, and your draperies will never be pleated or creased perfectly, but helping them “learn” how to fold will make them have a more finished look in the long run.

That is my rundown on draperies… now do you see why it is worth hiring a pro? haha! There is way more to it than you might think, but if you take my advice and invest in custom, tailored draperies I promise that you will love them and not be disappointed!